Wednesday, January 10, 2018

How to Cook Beef Tongue – It’s Easier Than You Might Think

Cow tongue, beef tongue, ox tongue – no matter what you call it, learning how to cook beef tongue may seem intimidating, but it's surprisingly easy to do. The simple cooking method that I like to use creates a tender, delicious cut of meat that can be served like a roast or sliced thin and used cold for sandwiches. Since we buy our beef in bulk from a local friend who raises grassfed steers, it's important for us to be to be able to use up all the odd bits.

Cooking Cow Tongue – Quick Guide

What you need to cook a cow tongue:

  • cow tongue
  • seasoning- 1 onion, 3 cloves garlic or garlic scapes (or more), 3-4 bay leaves, celery, salt and pepper to taste, or other spices of your choice
  • stock pot with lid (6 – 8 quart)

Steps for cooking tongue:

  • Wash the cow tongue
  • Place the tongue in the stock pot with the seasonings and enough water to cover
  • Cover and simmer the cow tongue for 2-3 hours
  • Chill the tongue in an ice bath until just cool enough to handle and peel immediately
  • Slice and serve hot or chill and serve cold

Cow tongue, beef tongue, ox tongue - no matter what you call it, it's an odd looking piece of meat. Learning how to cook beef tongue may seem intimidating, but it's surprisingly easy to do. The simple cooking method that I like to use creates a tender, delicious cut of meat that can be served like a roast or sliced thin and used cold for sandwiches.

How to Cook Beef Tongue – Step by Step with Photos

The first time I cooked beef tongue, I had some help from my big sister, Lois. After all, what are big sisters for if not to help you eat strange things? When we pulled the tongue out of the freezer, it looked like this.

Cow tongue, beef tongue, ox tongue - no matter what you call it, learning how to cook beef tongue may seem intimidating, but it's surprisingly easy to do. The simple cooking method that I like to use creates a tender, delicious cut of meat that can be served like a roast or sliced thin and used cold for sandwiches.

Lois gave it a good washing and held it up for a nice shot.

Washing the cow tongue before cooking.

Cooking beef tongue couldn't be much simpler. The tongue doesn't have bones or connective tissue to deal with like other cuts. Mom always simmered it on the stove when we were kids, so that's what we did, too. We put it in a kettle with about an inch of water over the top, and added plenty of aromatics – garlic scapes, onions, bay leaves, salt, pepper, and some celery.

Cow tongue, beef tongue, ox tongue - no matter what you call it, learning how to cook beef tongue may seem intimidating, but it's surprisingly easy to do. The simple cooking method that I like to use creates a tender, delicious cut of meat that can be served like a roast or sliced thin and used cold for sandwiches.

Cover and simmer for 2-3 hours. When the tongue finishes cooking, place it in an ice water bath to chill it enough to handle.

Cow tongue, beef tongue, ox tongue - no matter what you call it, learning how to cook beef tongue may seem intimidating, but it's surprisingly easy to do. The simple cooking method that I like to use creates a tender, delicious cut of meat that can be served like a roast or sliced thin and used cold for sandwiches.

Once you can handle the tongue, peel off the skin.

Cow tongue, beef tongue, ox tongue - no matter what you call it, learning how to cook beef tongue may seem intimidating, but it's surprisingly easy to do. The simple cooking method that I like to use creates a tender, delicious cut of meat that can be served like a roast or sliced thin and used cold for sandwiches.

Now you have an excellent piece of meat.

Cow tongue, beef tongue, ox tongue - no matter what you call it, learning how to cook beef tongue may seem intimidating, but it's surprisingly easy to do. The simple cooking method that I like to use creates a tender, delicious cut of meat that can be served like a roast or sliced thin and used cold for sandwiches.

Slice thinly and serve with your choice of condiments. My brother Rich suggests horseradish. Get a recipe for homemade horseradish sauce here.

Cow tongue, beef tongue, ox tongue - no matter what you call it, learning how to cook beef tongue may seem intimidating, but it's surprisingly easy to do. The simple cooking method that I like to use creates a tender, delicious cut of meat that can be served like a roast or sliced thin and used cold for sandwiches.

And that's it! It's very tender and delicious. The boys couldn't tell it wasn't “regular” roast. (Personally, I found it to be more tender than the roast we had cooked the day before.)

So, what unusual meats have you enjoyed recently? I'd love to hear from you.

You may also enjoy:

Originally published in 2011, updated in 2016, 2018.

The post How to Cook Beef Tongue – It’s Easier Than You Might Think appeared first on Common Sense Home.

The post How to Cook Beef Tongue – It’s Easier Than You Might Think appeared first on Homesteading Alliance.


How to Cook Beef Tongue – It’s Easier Than You Might Think syndicated from https://homesteadingalliance.com/


Chickens the Pet that Poops Breakfast

Haha… how about THIS? A perfect gift for a friend who has a good sense of humor. This is a hand painted sign on a piece on pine wood attached pallet style. The wood is Red distressed style. White paint is used for the lettering and design. The back is left unfinished and it comes ready to hang with an attached saw tooth hanger. This is available in the link below….

Find it HERE…

More ideas:

This post originally appeared on goodshomedesign.comSee it here

The post Chickens the Pet that Poops Breakfast appeared first on Homesteading Alliance.


Chickens the Pet that Poops Breakfast syndicated from https://homesteadingalliance.com/


6 Tricks To Ensure Your Fruit Trees Survive The Winter

Image source: Pixabay.com

Experienced homesteaders know that just because the trees go dormant, the hens take a break from laying, and the garden goes fallow it doesn’t mean that you can go into hibernation from December to March.

Among the many wintertime tasks on the farm, you can’t forget to include tending to your fruit trees. Proper overwintering of fruit trees helps them to survive the cold months and can get rid of any hidden fungal spores, bacteria, and insect eggs that can wreck havoc come summertime. The three simple steps include: insulation, pruning and spraying.

1. Prioritize autumn clean-up. Start winter preparation by cleaning up your orchard during autumn. Remove fallen, rotting fruit from the ground and rake up fallen leaves. This debris can harbor hidden fungal spores, insects and their eggs. Rotting fruit is also an invitation to animal invaders to move in. Be sure also to remove any dead fruit from the tree. After the leaves have fallen, give your fruit trees a thorough inspection for signs of disease or damage. Look for any cracks, discolorations, unusual growths or other signs of damage. Remove or treat any wood that shows signs of disease.

2. Prevent sunscald. Before the cold really sets in is the time to protect your trees from sunscald. Sunscald occurs in the winter when the sunlight heats the bark during the day, waking it from dormancy, and then freezes again at night, causing an open scar. The scar can become an inviting opening for insects and disease. To protect your trees from sunscald you can use a commercial tree wrap — like crinkled paper or spiral plastic wrap — to wrap the trunks of young trees. Older trees can be treated with a 1:1 solution of water and white latex paint.

3. Guard against animal invaders. If you have a busy wildlife presence in your area, you also may need to protect your fruit trees from deer, rabbits, mice and other animals that are looking for an easy wintertime meal.

“The Big Book Of Off The Grid Secrets” — Every Homesteader Needs One!

For trees less than 5-7 years old, use tree wraps or wire mesh to protect trunks from mice and voles, making sure they are partially buried. Though nothing short of an 8-foot fence is guaranteed to keep deer at bay, a barrier of poultry netting or woven wire can help protect your trees. Scent repellants also may work, including liquid repellents like coyote urine or hanging a highly scented bath soap from the tree’s branches.

6 Ways To Ensure Your Fruit Trees Survive The Winter

Image source: Pixabay.com

4. Insulate the roots. When it comes to winter prevention, insulating your roots is the most important task. A nice, thick layer of mulch is the best way to keep roots warm. Mulch should be a few inches thick all year long and even thicker in the winter (4-6 inches for young trees). You can use a variety of organic materials as mulch, including bark mulch, leaves, pine straw, wood chips and straw. Snow works, too! For the very best protection, cover your mulch with an insulated barrier like black landscape fabric or a black trash bag.

5. Prune the trees. Prune from December to February when the trees are dormant. Weak branches are an easy target for bacteria or insects to lay eggs, so weed them out now before it’s too late. First remove those dead, dying or diseased branches you noticed back in the fall. For diseased branches, be sure to cut the next juncture down to be sure of removing all the affected wood. Next, remove branches that are rubbing or at risk of growing into one another, branches that grow straight out, and root suckers. When pruning fruit trees be sure to sterilize your shears between cuts to prevent disease transfer. This can be done by rubbing them with denatured alcohol or a 1:99 solution of bleach and water. Tea tree oil is also a natural choice.

6. Wash the trees. The dormant season is prime time to “wash” fruit trees. Washing, or spraying, is the most successful way to kill off any bacteria, fungal spores, insects or insect larvae that may be hiding in your tree. Spraying should only be done in the winter when trees are deeply dormant, before any new buds have begun to show. Dormant oil sprays are available online or in most gardening and home improvement stores. These usually contain some type copper and/or lime, fish oil, or plant-based oil and can be found in organic forms, as well. Do your spraying when temperatures will be consistently above freezing for a few days. Make sure to wet all surfaces thoroughly, especially bark fissures. Since these sprays work as a contact insecticide, getting into all the nooks and crannies — especially around the base of the trunk — they ensure that you will kill off all of those hidden aphids, mites and other harmful bugs.

What advice would you add? Share your tips in the section below:

Every Year, Gardeners Make This Stupid Mistake — But You Don’t Have To. Read More Here.

This article first appeared on offthegridnews.com See it here

The post 6 Tricks To Ensure Your Fruit Trees Survive The Winter appeared first on Homesteading Alliance.


6 Tricks To Ensure Your Fruit Trees Survive The Winter syndicated from https://homesteadingalliance.com/


18 Benefits of Raised Bed Gardening You May Have Never Considered

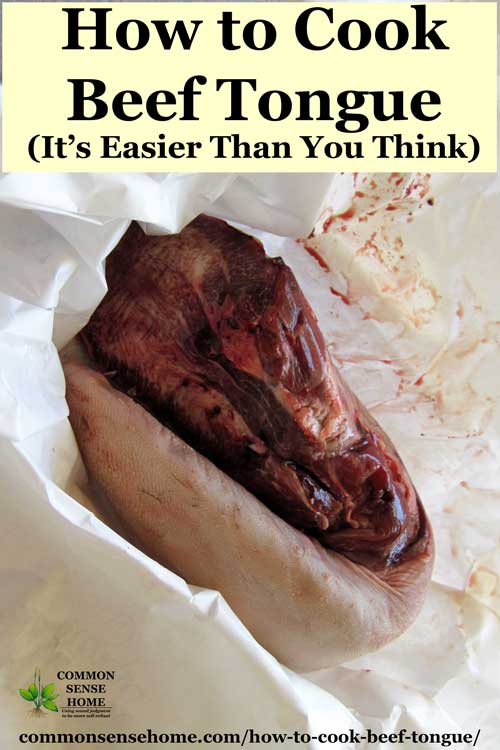
Do you garden in a traditional bed or a raised bed? I actually use both because I find that they both have their benefits.

For instance, I like raising items that I’m going to need a lot of in a traditional style bed. Then I can use our tractor to do most of the weeding.

However, when I raise smaller batches of plants, or I raise plants that take longer to produce, then I prefer using raised garden beds.

But there are so many other perks to using a raised garden bed. If you don’t have them, after reading this, you just might change your mind.

Benefits of Raised Bed Gardening

1. You Can Have Nice Pathways

via Popular Mechanics

One thing I don’t like about a traditional garden is I struggle to have nice walkways. The plants get so big that as the growing season goes on, it can be hard to maneuver with ease through a traditional garden.

Well, that isn’t the case when you garden with raised beds. You can arrange the beds any way you like. Then you can put stepping stones on the pathways, mulch, or any other decorative way you would want to design your garden pathways. In the process, this helps to keep weeds down too.

2. Usually, You Produce More

Raised garden beds are a little easier to baby because of the smaller amount of space you have to keep up with.

So with the more accessible maintenance, better aeration, less soil compaction, along with fewer pests and weeds it usually equates to having more vegetation being produced from a raised garden bed.

3. Some Can Be Portable

Did you know that not all garden beds have to stay in one place? You can actually create them where they have wire mesh in the bottom.

Then when you want to move them around based on sunlight and what you’re planting, they can be dragged through your yard to a new location. That is pretty awesome if you are someone that likes to change things around, or you worry about crop rotation.

4. Easy to Grow Smaller Amounts

I usually use my raised garden beds for when I want to grow a smaller amount of something. In our case, my husband loves jalapenos.

But let’s be real. I only need so many of them. They are a good option for us to plant in a raised garden bed, where we can grow some but don’t have a to fill up a row in our garden with them.

5. Soil Compacting Prevention

When your soil gets compacted it is hard for anything to grow well in it. With raised garden beds, you don’t have to worry about your ground becoming as compacted.

Basically, you are adding soil to a box. This soil isn’t walked on nor does it get beat down as much by the elements. So the soil stays lighter and fluffier, which makes it easier for your vegetables and other plants to grow in that soil.

6. Better Drainage

When dirt is less compacted, it makes the soil drain better. The moisture has room to move around and to drain when it needs too.

So when you have better drainage, it means your plants will be healthier and provide better production as well.

7. Makes it Harder on the Pests

There are all kinds of pests constantly waiting to feed on your garden. This is a problem because if they are feeding on your plants that usually means you won’t be able to.

But when you use raised garden beds, it makes it more difficult for pests to get to your plants. If the beds are a lot higher off the ground, then it means that they can’t just jump from plant to plant like they can in a traditional garden. Even if they are closer to the ground, the box creates a barrier which also creates challenges for pests.

8. Physically Easier to Maintain

via Tractor Supply

Digging around in a flat garden can be really strenuous work. It can be especially difficult on your knees and back.

But with raised garden beds, they can be higher, and a lot of them even have nice ledges for you to sit on. Here are some great raised garden bed plans that you might really love.

9. Offers Protection

I initially began using raised garden beds because it seemed no matter where I planted my bulb plants, my chickens would constantly dig them up.

Then I planted them in a raised garden bed, and my birds seemed to leave them alone. So again, raised garden beds can offer protection for bulb plants when they might be feasted upon by birds or squirrels. They can help protect against the larger pests, not just the bugs.

10. Makes Gardening Possible

via Earth Easy

Have you thought about how many people are disabled, would love to garden, but feel they can’t because gardening in a traditional garden might be too difficult because of physical limitations?

Well, there are lots of people in that boat that might want to tune into the idea of gardening in raised beds. We had to garden a little differently for my mother-in-law when she became too ill to be able to do what she loved most, which was gardening. But raised beds really made things a lot easier for her.

11. Good Aeration

I’ve mentioned this a little before, but good aeration is a definite bonus to gardening in raised beds. When the dirt doesn’t become quite as compacted as traditional dirt, it allows it to stay light and fluffy.

Well, that light and fluffiness also allow for air to move around. This creates better soil and healthier plants in the process.

12. Room for the Roots

I know I keep harping on how much better the soil can be in a raised garden bed, but it really can make all of the difference when planting items in them.

For instance, because the soil isn’t compacted and is better aerated, it makes it easier for the roots of plants to spread out. This creates stronger and healthier plants. Which should result in them being able to fight disease better and also make them yield more fruit too.

13. Tree Roots Can’t Mess with It

Do you have a wooded property? We once did, and it can make planting quite hard because tree roots will always get in your way.

Well, when you plant in raised garden beds, the tree roots aren’t usually an issue. The plants aren’t digging into the ground like they would in a traditional style garden, so they don’t run into roots making it difficult for them to grow.

14. Can Extend Your Growing Season

Do you live in an area where you are working on a limited growing season? If so, then you’ll want to tune into the idea of using raised garden beds.

Because raised beds have soil in them that are not part of the ground, they can thaw a little faster than your traditional soil. Which means you can plant earlier in raised garden beds than you can actually plant into the ground.

15. Visibly Appealing

Raised garden beds are quite appealing. They make your garden look neater and are something that people like to see.

Plus, since they can be made with a sitting area on the sides, they seem more inviting as well. So if you’d like to have an attractive garden, then you might want to start with raised garden beds.

16. Easy to Build and Inexpensive

Our first raised garden beds were actually created from wooden slabs. They looked rustic but were very charming with the style of the rest of the house.

But the best part was they cost us nothing to build because we found a lumber mill where we got slabs for free. So if you would like to create raised beds just think outside of the box a little, and you might be surprised how inexpensive and easy to build they really can be. Here are some raised garden bed ideas.

17. You Have More Options

When it comes to raised garden beds, you have lots of options. You can make them as large or small as you’d like.

But when you grow a traditional garden, it can be difficult always to create the desired plot size. However, with raised garden beds, you just build them to suit, and they’ll be unique to your taste.

18. Easier Upkeep

I already mentioned that raised garden beds can be more comfortable for you physically to maintain them, but logistically they are as well.

When we have a large garden I have to really think how I’m going to be able to maintain it all because of keeping the weeds down. Well, when you have a raised garden bed, there is less room for the weeds (and your back isn’t killing you from being bent over) so it is easier and less time-consuming to keep them from unwanted weeds.

Well, you now have 18 different benefits of gardening in a raised bed. They are quite handy to have, even if you do like I do and don’t grow everything in them.

But you can’t deny that they definitely have their benefits and can make life easier at times.

However, I’d like to hear from you. Do you garden in raised beds? What benefits have you noticed from gardening in them vs. a traditional garden? Would you recommend raised bed gardening? Why or why not?

We love hearing from you all, so please leave us your thoughts in the space provided below.

The post 18 Benefits of Raised Bed Gardening You May Have Never Considered appeared first on Homesteading Alliance.


18 Benefits of Raised Bed Gardening You May Have Never Considered syndicated from https://homesteadingalliance.com/


12 Home Remedies for Earaches – Ear Pain Relief for Kids and Adults

I've put together a list of 12 home remedies for earaches, which are commonly paired with congestion, coughs and sore throats. Use these earache remedies to help provide earache relief for children and adults. We also have tips at the end of the post for avoiding ear infections in the future.

Why is my ear in pain?

Ear pain is most commonly associated with fluid buildup behind the ear drum linked to an ear infection. Thankfully, most ear infections get better without treatment, i.e., antibiotics are not required. In fact, clinical studies have noted that the most commonly prescribed antibiotic, amoxicillin, is no more effective than a placebo.

Sometimes ear pain is caused by injury, or water or other fluid trapped in the ear. The focus of this post is earache due to colds/infection and inflammation.

Note: For very young children, heat and steam are the safest earache remedies, or plain warm olive oil or coconut oil. Adults and older children may use any of the treatments.

Never use eardrops or oils inside the ear if a child has ear tubes or there is a chance of eardrum perforation. Please see your healthcare practitioner if pain is extreme, or if your child has a fever over 100.4 F or discharge coming from the ears.

#1 – My First Choice in Earache Remedies – Heat

When I was a little girl, I remember having an ear infection accompanied by one very sore ear. To help me feel better, my mom took a small throw pillow and warmed it up in the oven. She left it in a bit too long, though, and it started to singe. The fire was put out, and I got to rest my head on one slightly charred pillow – which really did help to relieve the ear pain.

Nowadays most houses have microwaves, which make it easier to heat up a hot pack to help with ear pain. You can buy or make a hot pack. Core Products, a small business located in western Wisconsin, makes soft covered hot/cold packs that we use as foot warmers at night and for treating headaches and earaches.

To make a simple hot pack for ear pain relief, place popcorn or rice into an old sock or small pouch. Seal end and heat in short bursts until warm. Hot water bottles are a great option if you don't have a microwave – just make sure you don't get the water too hot.

#2 – Steam

If you can’t keep a hot pack on your little one’s sore ear, try plugging in a humidifier or taking a warm shower. (This works for adults, too.) Colds and sore throats lead to swelling and inflammation in the airways. Opening and relaxing airways with warm, moist air can relieve pressure and ease ear pain.

12 home remedies for earaches, which are commonly paired with congestion, coughs and sore throats. Use these earache remedies to help provide earache relief for children and adults. We also have tips at the end of the post for avoiding ear infections in the future.

#3 – Garlic Oil

There are dozens of variations of garlic in olive oil for earaches. One of the ones I like best is the “Children's Ear Oil” from Herbal Antibiotics, which combines garlic and eucalyptus for a double anti-bacterial, anti-viral punch. Clear the ear infection and you get rid of the earache.

This should be stored in a tinted bottle in a cool dark location, or in the refrigerator, and used within two weeks.

Children's Ear Oil

Adapted from Herbal Antibiotics

Ingredients

  • 5 cloves garlic, finely chopped
  • 4 ounces (1/2 cup) good quality olive oil
  • 20 drops eucalyptus essential oil

Directions

Place garlic and olive oil in a small sauce pan on low heat. Cook overnight or for eight hours. Strain, squeezing well to get as much oil as possible out of the garlic. Add eucalyptus essential oil and mix well. Store in a tinted bottle.

To use: Place glass eyedropper in a stream of hot water for 1 minutes (to warm dropper). Dry quickly (to retain heat) and suction up ear oil from bottle. Place 2 drops in both ears every half hour or as often as needed for 2 to 7 days. As mentioned at the top of the post, never place fluid into the ear if the eardrum is perforated.

#4 – Mullein Oil

Common mullein (Verbascum thapsus) is used for treating respiratory ailments and many other illnesses. (See Weekly Weeder #13 – Common Mullein for more info.) As an earache treatment, infuse the flowers and buds in olive oil, and then apply them to the ear in the same manner as the garlic oil above.

To infuse the flowers in oil, gather enough blooms to partially fill a small jar. Cover with olive oil and let sit for a week or two. Strain and place in a tinted bottle. You can watch a video showing how to gather mullein flowers below. I like to let my blossoms set in a shallow bowl or on a plate for an hour or so before putting them in a jar with oil to give any buggies hiding in them a chance to escape. You can also add a clove of chopped garlic to your oil for extra germ fighting. For more information on the garlic and mullein oil, you can visit Kitchen Stewardship's Natural Earache Remedy post.

If you don't have fresh mullein blossoms available, you can buy mullein oil already made, such as the Ear Oil (with mullein and garlic) and mullein oil from Herb Pharm. Click here to order Herb Pharm Ear Oil for kids. They also carry St. John's Wort oil, which is recommended for earaches in the book Prescription for Herbal Healing.

#5 – Essential Oil Ear Ache Treatment Rub

This recipe is adapted from the book “Be Your Own Doctor” by Rachel Weaver, M.H.. Remember, do not apply undiluted essential oils directly to the skin – always use a carrier oil. I don’t recommend this as an earache remedy for small children, who may rub their ears and then rub the oil into their eyes. Because of their potency, I prefer essential oils for use in earache remedies for adults or older children.

Essential Oil Earache Rub

Ingredients

  • 1/4 cup olive oil
  • 10 drops tea tree essential oil
  • 10 drops lavender essential oil

Mix all ingredients and apply gently around the ears at the first sign of infection. Reduces infection and relieves inflammation.

#6 – Herbal Steam Inhalations

Herbal steam inhalations help reduce nasal swelling caused by cold, dry winter air and increase airflow to the eustachian tubes.

To prepare an herbal steam inhalation, simply heat up a pot of water and pour it into a bowl or basin. Add a handful of fresh or dry herbs such as German chamomile, elderberry flowers and/or lemon balm. Lean over the basin and inhale the steam. To get the most out of the treatment, use a large towel to create a tent over your head and trap the steam. This is another earache remedy that works best for adults or older children, since you need to be careful around the basin of hot water and be patient while you steam your head.

Earache remedy - apple cider vinegar

#7 – Apple Cider Vinegar

As I researched home remedies, I've found that people use apple cider vinegar (ACV) to cure just about everything. Earaches/ear infections are no exception. Dee from San Diego, California writes on Earth Clinic:

“Apple cider vinegar also works great when getting an earache. My ENT told me to put some in the ear at the first sign of trouble, leaving it there for a minute then letting the ACV run out the ear… Repeat one more time 12 hours later. This has worked for us!”

#8 – Hydrogen Peroxide

My friend, Julie, told me her mom used hydrogen peroxide in the ears of all 12 of her children. It's also one of the most popular remedies on Earth Clinic.

The easiest way to use hydrogen peroxide for earache pain relief is to soak a cotton ball and use it to squeeze a few drops into the ear. This will work to dislodge debris, so gently irrigating the area afterward with warm water to flush the debris clear may also be helpful.

#9 – Hot Herbal Tea

While you're applying warmth from the outside, you can also apply warmth from the inside. Echinacea, German chamomile, and holy basil are herbs that promote healing and relaxation. Echinacea is particularly effective against infections that affect the ear, nose and throat area.

#10 – Onions

Onions are a preferred earache remedy in the book Be Your Own Doctor and with some of the folks on Earth Clinic. Some people simply cut an onion in half and place it over the affected ear. Others gently heat a small portion of the onion until warm but not soft, and tuck the heated onion into the ear as an earache cure. Some people wrap the onion in a warm, moist cloth; others use it directly on the ear.

Another option is to squeeze out some onion juice, heat gently, and put a few drops into the ear. Recommended onion ear compress time is around 10-15 minutes, or until the onion cools. Rest quietly while treating, and gently clean out the ear with warm water after the onion treatment.

#11 – Homeopathic Earache Relief Ear Drops

Homeopathic earache relief drops such as Similasan are popular for earache treatment and have been in use for decades. Similasan earache relief drops active ingredients include:

  • Chamomilla 10X – for sensitivity to drafts, soothing
  • Mercurius solubilis 15X – relieves fullness, sensitivity to cold
  • Sulphur 12X – reduces itchiness, sensitivity to water

#12 – Over the Counter Pain Relievers

Ear pain is linked to inflammation, so nonsteroidal anti-inflammatory medications such as Ibuprofen (Advil, Aleve, Motrin) can help relieve ear pain. You still need to clear the infection to address the underlying cause of the ear pain, so these aren’t my first choice, but can help alleviate the pain enough so you can rest and heal.

12 home remedies for earaches, which are commonly paired with congestion, coughs and sore throats. Use these earache remedies to help provide earache relief for children and adults. We also have tips at the end of the post for avoiding ear infections in the future.

Earache remedies – mullein, olive oil and garlic

12 Home Remedies for Earaches is part of the Home Remedies series, which also includes help for congestion, coughs and sore throats.

Elderberry syrup has been shown to be effective against some influenza virus strains, so it may help speed healing. Click here to see the full list of cold and flu home remedies.

Preventing Ear Pain Before it Starts

If chronic ear infections are a problem, it should be noted that households with smokers have more ear issues, and infants who are breast fed have less than their formula fed counterparts.

Food allergies may be linked to ear pain

Also, many times food allergies can contribute to chronic ear infections. If you deal with chronic ear infections or other chronic health problems, try adjusting your diet. Common allergens include dairy, gluten, eggs, soy, peanuts, tree nuts – work with your health care provider to see if you can identify any problem foods. Keeping ears clean and dry can also help prevent ear issues.

Xylitol gum may help prevent ear infections and earaches.

Xylitol Helps Prevent Ear Infections

Finnish researchers found that daycare children given five servings of two pieces of xylitol sweetened gum per day reduced their number of ear infections by nearly half. Another study found that using larger doses three times per day was not as effective – frequent dosing was required. You can read a detailed analysis of the studies in the article “Ear Infections and Xylitol“. While this is not a conventional ear pain reliever per se, it could help your child avoid the pain of an ear infection in the first place.

Try Lymph Drainage Massage for Chronic Ear Pain

If you have a persistent ear/sinus issues, check out this video from MassagebyHeather.com to help improve lymph drainage for the ears.

All information featured on this website is for educational purposes only. This information has not been evaluated by the Food and Drug Administration. This information is not intended to diagnose, treat, cure, or prevent any disease. Please work with a trained healthcare provider.

Recommended Products:

Don't forget to check out the Full List of Home Remedies , including:

Originally published in 2013, updated in 2017, 2018.

The post 12 Home Remedies for Earaches – Ear Pain Relief for Kids and Adults appeared first on Common Sense Home.

The post 12 Home Remedies for Earaches – Ear Pain Relief for Kids and Adults appeared first on Homesteading Alliance.


12 Home Remedies for Earaches – Ear Pain Relief for Kids and Adults syndicated from https://homesteadingalliance.com/


Tuesday, January 9, 2018

It’s 1,000 Years Old. It’s Edible. And It’s On Your Property

Image source: Steve Nubie

We usually ignore them and don’t even notice them, but they’re one of the most primitive lifeforms on Earth. They’re also good eatin’.

They are lichens, a form of algae with a fungus membrane to support the plant. But they don’t grow in water; they grow on trees and rocks and sometimes on the ground.

Some of the lichens you see in the wild could be hundreds if not thousands of years old. That’s why you shouldn’t pick or scrape lichens arbitrarily. In a survival situation, all bets are off, but if you’re not going to eat it, respect it and leave it alone.

Most lichens are benign, a few are toxic and only a couple have been identified as poisonous. This is not as severe as the mushroom world, where there are numerous varieties that are downright deadly, but you gotta know your lichens.

In fact, only two forms of lichen out of 20,000 varieties are defined as poisonous. One is called Vulpacida pinastri and the other is called Letharia vulpina. Their common names are the powdered sunshine lichen and the wolf lichen.

It’s 1,000 Years Old. It’s Edible. And It’s On Your Property

Image source: Steve Nubie

Both are colored yellow and as a general rule you should avoid lichens that are yellow or orange. The wolf lichen is greenish yellow and the powdered sunshine lichen is sulfur yellow. It’s the blue and green varieties that are typically safe to eat.

Lichens 101

Before you dismiss lichens as some caveman survival food, you should know that Chef René Redzepi of the Noma restaurant in Copenhagen has touted lichens as a critical part of his cuisine. He has been identified as the top chef in the world by numerous publications and culinary organizations, and he uses lichens regularly in many of his dishes.

But you might not agree if you simply start chewing one you’ve just picked off a tree.

Get The Essential Secrets Of The Most Savvy Survivalists In The World!

According to the U.S Forest Service, here’s the dictionary definition of a lichen:

Lichens are dual organisms consisting of a fungus and an alga or a cyanobacterium. The fungus provides the alga with structure, protection, nutrients, and water absorbed from the atmosphere and the substrate (e.g., soil, rotten logs, tree branches). In return, the alga provides carbohydrates from photosynthesis to the fungus. Algae from some lichens grow independently of the fungus, but in lichen form, the algae can inhabit more challenging environments than when growing alone.

There are three types of lichens based on these photos from the U.S. Forest Service:

It’s 1,000 Years Old. It’s Edible. And It’s On Your Property

Foliose (leaf-like)

It’s 1,000 Years Old. It’s Edible. And It’s On Your Property

Fruticose (shrub-like)

It’s 1,000 Years Old. It’s Edible. And It’s On Your Property

Crustose (growing closely attached to a surface)

Wherever you live in the world you’ll probably encounter one of these types, if not all three. Northern latitudes tend to see more prolific lichen growth. That’s good news in a winter survival situation.

How Do Lichens Taste?

A raw lichen right off the tree or a rock is going to have the consistency of a rubber inner tube and taste highly acidic if not downright astringent. You have to soak them in water for hours, with frequent water changes. This will get rid of the natural acids that permeate the lichen.

A Japanese technique is to gently boil them with frequent water changes. This will result in a lichen that is quite gelatinous. In case you’re wondering, “gelatinous” means slimy, similar to the slime you see when you boil okra or cactus. It’s OK to eat it, but be prepared.

In a pure survival situation, you would soak the lichens in water with frequent water changes and eat them like potato chips. They’re going to be tough blue or green potato chips, but they’ll help to keep you alive.

In a more civilized environment, you can slice them and toss them in a pasta with olive oil, or add them to a soup or broth to thicken the soup. Even in a simple cup of chicken broth, lichens will add viscosity and body, making it sip more like a gravy than a watery broth.

In Scandinavia, lichens are often added to flour for bread-making after they have been soaked in multiple water changes and the acid has been leached out.

A modern technique is to add bicarbonate of soda in a proportion of one teaspoon to a quart of water. This will also help neutralize the acids.

In Africa, lichens were used for jelly-making with locally harvested fruits. It has the same qualities as gelatin and was also used by American pioneers prior to commercially made gelatin becoming available.

Regardless of the technique you chose to use, I would strongly recommend soaking the lichens in a bowl of vinegar for at least 30 minutes before you soak them in the water changes. Vinegar is a powerful antiseptic and will kill any germs on the lichen’s surface. That’s important because these organisms have potentially been exposed to elements for thousands of years. That gives them plenty of time to pick up some nasty microbes.

In a survival situation, you may only have water or at least boiling water to sanitize any lichen. In this instance, I would prefer lichens growing on a tree and preferably under a large, over-hanging branch. No guarantees but it may have had less exposure to the elements in this kind of environment as opposed to lichens growing on rocks.

Nutritional Value

The nutritional value varies, depending on the species and the amount. Generally, lichens have some of the nutritional benefits of a well-known form of algae called “spirulina.” It has vitamins like vitamin K and vitamin C, some carbohydrates and a fairly good calorie count based on the size.

Harvesting Lichens

Older, more mature trees tend to provide the most lichens. This is because it takes them so long to grow. Rocks and cliff faces also will provide lichens. On a canoe trip in Canada I remember seeing a large slab of granite on the shoreline covered in lichens like a patchwork quilt. Just make sure you stay away from the yellow and orange ones.

The best tool for lichen collecting is a knife. You have to cut it away from the rocks or trees. They come off simply, but most tree lichens will have some tree bark attached. The external tree bark of any tree is indigestible, so try to shave it away. I’ve sometimes used my thumbnail to do this.

However, winter presents some unique problems. The lichens are typically frozen. You may want to grab more bark from a tree and deal with it after you’ve soaked it. The same is true for rock lichens.

To preserve lichens for future use, sanitize them in vinegar for 30 minutes, do numerous soaks in water changes for a few hours, and then dry them in a food dehydrator. When it’s time to eat, rehydrate them in cold or gently boiling water.

Lichen Recipes

There are two lichen recipes that I make from time to time:

Lichen Ramen Soup

It’s 1,000 Years Old. It’s Edible. And It’s On Your PropertyIngredients

  • 1 package of Ramen noodles plus broth seasoning
  • 2 cups of water
  • 1 cup of lichens soaked in water changes and cut into julienne strips
  • 1 teaspoon of soy sauce

Directions

Soak the lichens in vinegar for 30 minutes and then put them through continuous water soaks for about 4 hours, changing the water every hour. Add the two cups of water to a saucepan and then add the Ramen soup flavoring packet. While you’re waiting for the water to come to a boil, slice the lichens into thin strips. Add the noodles to the water when it’s boiling and then add the lichen strips. When done, spoon and serve into bowls.

Lichen Pasta

Ingredients

  • 1 quart of water
  • 1 tablespoon of salt
  • 12 ounces of pasta (any variety)
  • 3 tablespoons of olive oil
  • ½ cup of parmesan cheese
  • 1 cup of thin sliced or julienned lichens
  • 1 tablespoon of parsley

Directions

Prepare the lichen as indicated previously in rinses of vinegar followed by rinses of water. Add water and salt to the pot and bring to a boil. Then slice the lichens and set aside. Add the pasta to the boiling water and cook until done. Drain the pasta and toss with the olive oil, parmesan cheese, lichens and top with parsley. Serve.

Have you ever eaten lichen? What advice would you add? Share it in the section below:

Learn How To ‘Live Off The Land’ With Just Your Gun. Read More Here.

This article first appeared on offthegridnews.com See it here

The post It’s 1,000 Years Old. It’s Edible. And It’s On Your Property appeared first on Homesteading Alliance.


It’s 1,000 Years Old. It’s Edible. And It’s On Your Property syndicated from https://homesteadingalliance.com/


Tips For Reaching Your Homesteading Goals This Year

Image source: Pixabay.com

Making goals is part of life for everyone all the time, but most people tend to focus on them a little more this time of year. Establishing goals for the homestead is as important as setting personal goals, and often the two go hand-in-hand. Given the deeply personal nature of homesteading, my goals for my place are likely to look different from yours, but here are a few basic guidelines to get you started in the right direction on your own.

First, a word to the wise: If you share your homestead with anyone, it is crucial that you and they are on the same page with goal-making. If you want to take up beekeeping but your spouse is afraid of bees, or if you plan to build a sawmill while your parents envision devoting the coming season to doubling the size of the vegetable garden, these things are going to have to be ironed out first.

Another important point is to keep it doable. It is so tempting to want to dive into everything head-first, and too easy to end up in over our heads. Most homesteaders are passionate about what we do, which is what makes us able to accomplish so much with so little. Passion for homesteading is great, but don’t let it drown you.

There are three major factors which form the framework for goal-setting for homesteaders: money, time and most urgent needs.

Money and Time

Money and time are often homesteaders’ biggest obstacles. Many of us need off-farm jobs which, while they help pay for materials and supplies for the homestead, end up taking away from the time we need to work on homestead projects. It can be a constant juggling act, but few of us can afford to disregard either factor.

Get Free Backup Electricity And Never Be Without Power!

The factor of most urgent needs covers a broad spectrum for homesteaders. Most of us strive for self-sufficient lifestyles that include managing vegetable gardens, perennial fruits and a wide variety of livestock—including attention to feed, housing, fencing, breeding, healthcare and milking—along with activities such as processing firewood, tapping trees for syrup, making soap, using medicinal herbs, and more. Not only do we already have all those balls in the air, but most of us are usually trying to pick up even more and to improve the ones we are already handling.

The way to make it work is to prioritize. Some ways to do that include making a chart, doing research, and evaluating positive impact versus cost—or better still, all three.

Charts or spreadsheets offer a concise way to compare costs, importance, work hours required, potential benefits, and whatever else is an important factor to you. Once you lay it out on paper or on a screen, it should allow you to accurately identify what projects and tasks to tackle first.

Doing research ahead of time helps avoid surprises that can end up being overwhelming and increasing the likelihood of failure—as in, how much will that new maple syrup evaporator really cost with all the extras? Or, is this type of crop truly feasible in my climate? Or perhaps it’s useful to determine beforehand when purchasing used farm equipment if replacement parts will be available, or whether a planned livestock expansion will end up requiring more investment in infrastructure.

Evaluating positive impact versus costs can make or break a project—will the milk room upgrade or licensure pay for itself in dairy product sales, or will paying for a professional survey allow the sale of some timber, or does it make sense to take out a loan to buy some additional acreage or to seek crowdfunding to pay for a barn addition? Crunching the numbers ahead of time is vital.

Don’t Forget Small Goals!

Small goals matter, too. I try a new vegetable in my garden every year, to determine if I can successfully grow it or even just to experiment with eating something new. I often move my livestock infrastructure around—a new pen in the barn here, a new gate there—just to tweak their comfort or my convenience. Perhaps you want to try raising lambs for meat this year, or incorporating a new breed of laying hen, or maybe try again with a hügelkultur attempt that didn’t quite meet your expectations the first time around.

Personal goals are closely intertwined with greater homestead goals. This can include everything from finances to education to hobbies to family planning to healthcare to disaster preparedness, and look different on every homestead.

Whatever goals you prioritize at your homestead, remember to choose those over which you have some control. Goals that depend too much on luck or weather conditions or someone else’s choices can leave you feeling helpless and frustrated if they don’t pan out. A better method is to develop plans centered upon your own actions and decisions.

The truth is, there are a lot of different successful ways to set homestead goals. In the end, what matters most with goals is that you proactively make them, are clear about what results you seek, understand what it will take to make them happen, and are on board with others on the homestead.

What advice would you add on setting homestead goals? Share your thoughts in the section below:

This article first appeared on offthegridnews.com See it here

The post Tips For Reaching Your Homesteading Goals This Year appeared first on Homesteading Alliance.


Tips For Reaching Your Homesteading Goals This Year syndicated from https://homesteadingalliance.com/